
Drupal Tips: From arrays to render HTML
Written on January 31, 2021
Category: Drupal Tips
Author: David Rodríguez, @davidjguru
 |
|---|
| Picture from Unsplash, user Denise Johnson |
Hello everybody! for this post I’m going to stop in a very effective utility for observing the direct relationship between the so-called “Render Arrays” of Drupal and the HTML final code itself, that in many occasions we’ll generating for our Drupal site. I was working on rendering some elements and thought it might be interesting to show that transition exists between a Drupal array and the HTML that will be inserted in the response from our server response, interpreting what Drupal really does from a Render Array with lot of properties and values inside.
I’m going to play with an array, passing it by a render service and getting the result transformation. This post was thought just like a short article. Let’s see.
This article is part of a series of posts about Drupal Tips.
1- Drupal Fast Tips (I) - Using links in Drupal 8
2- Drupal Fast Tips (II) - Prefilling fields in forms
3- Drupal Fast Tips (III) - The Magic of ‘#attached’
4- Drupal Fast Tips (IV) - Xdebug, DDEV and Postman
5- Drupal Fast Tips (V) - Placing a block by code
6- Drupal Fast Tips (VI) - From Arrays to HTML
7- Drupal Fast Tips (VII) - Link Fields from Twig
Introduction
I will use a single Drupal local installation from myself. In my local environtment I have a Drupal 9 deploy for testing, using DDEV-local as deploying tool. See more about DDEV-Local and know how deploy Drupal installations in some steps from a single snippet in my gitlab profile: Drupal 9 in six steps using DDEV: Quick Deploy.
I will use a single custom module available in my gitlab profile: ‘Managing Activities’, in order to get some structured arrays and testing the main idea. Use, downloading or cloning the code from here: gitlab.com/davidjguru/custom-modules/managing_activities) or from the main folder here: gitlab.com/davidjguru/custom-modules.
Please: These modules aren’t for Stage or Live / Prod. Modules only for dev, testing and fun.
I will use Xdebug in order to get internal info from some variables and follow the processing of the original Render Array, step by step. Cause I’m using DDEV-Local in all my local deploys, for me is very easy using and enabling Xdebug in Drupal projects. It’s quite fast, only go to your Drupal installation by prompt and ask:
local-project$ ddev xdebug on
And so Xdebug is enabled and ready to use. If you don’t know DDEV, please read these related articles and resources from here, my main website www.therussianlullaby.com and my repositories:
- Development environments for Drupal with DDEV
- Docker, Docker-Compose and DDEV - Cheatsheet
- Drupal Fast Tips (IV) - Xdebug, DDEV and Postman
- Books/ Local Web development with DDEV
- Installing Docker, Docker Compose and DDEV in Ubuntu - Bash script
Render Arrays
As we already know, the so called “Render arrays” in Drupal are just multidimensional PHP “arrays”, which as we have already seen here: davidjguru.github.io/php-performance#41–php-under-the-hood, are not specifically arrays as we know from another programming languages, but dynamic and relatively complex structures created in C language. These kind of arrays have a very-very extensive use in Drupal, just like an specific Drupalism.
The so called “Render Arrays” or “Rendered Arrays” in Drupal are like blocks in order to build Drupal sites. Are only associative arrays with structured data based in relationships key/value, from its properties defined in the Drupal API specifications.
Read more about the Render Arrays properties in Drupal, here.
For this case, I’ll use a render array from my custom module. I’m gonna take as base file this one, the ManagingActivitiesRegisterForm class, that extends FormBase in order to create a Drupal form using the rules of the Form API, building and delivering a render array returned by its method buildForm().
In this class, we’re building a render array just like this: see link to code lines. Some steps are:
I’m adding a div wrapper to the form:
   // Building the form.
    $form['#prefix'] = '<div id="register_form_wrapper">';
    $form['#suffix'] = '</div>';
Putting some elements:
$form['managing_activities_register_identification'] = [
      '#type' => 'textfield',
      '#title' => $this->t('Indentification Number'),
      '#attributes' => [
        'placeholder' => t('12345678A'),
      ],
      '#description' => $this->t('Set your Identification Number or DNI for the Spanish State.'),
      '#maxlength' => 30,
      '#size' => 30,
      '#weight' => '4',
      '#required' => TRUE,
      '#prefix' => '<div id="register_form_identification">',
      '#suffix' => '</div>',
    ];

$form['managing_activities_register_date'] = [
      '#type' => 'date',
      '#title' => $this->t('Date of birth'),
      '#description' => $this->t('Set your date of birth.'),
      '#weight' => '5',
      '#required' => TRUE,
      '#prefix' => '<div id="register_form_date">',
      '#suffix' => '</div>',
    ];
And at last, some actions and a custom JavaScript library using the property “attached”.
See the post: Drupal Fast Tips (III) - The Magic of ‘#attached’
$form['actions']['submit'] = [
      '#type' => 'submit',
      '#value' => $this->t('Request'),
      '#button_type' => 'primary',
      '#prefix' => '<div id="register_form_submit">',
      '#suffix' => '</div>',
    ];

// We're going to add the custom JavaScript related library.
$form['#attached']['library'][] = 'managing_activities/getting_feedback';
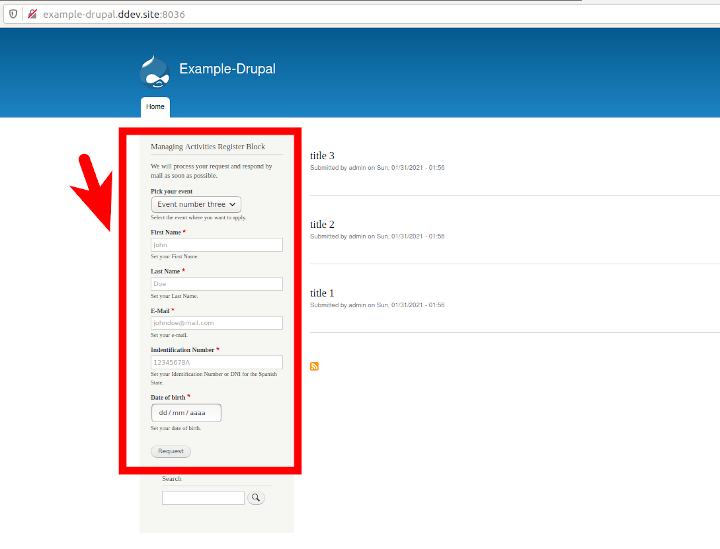
As we can see it’s a very normal render array, with a classical definition for a custom form. Plenty of pairs key/values using the properties defined by the Drupal Render API. Almost a standar in the daily work, isn’t it? This custom module creates a new form for registering in some king of activities and create new registers. The form will be show inside a block that is placed by config and code if you’re using the Bartik basic theme. In this case, you will show the new block placed at left side:
Also you can use an internal path defined in routing: /register-form and see the form like a internal page, defined from the classical routing.yml file:
managing_activities.register_form:
  path: '/register-form'
  defaults:
    _form: '\Drupal\managing_activities\Form\ManagingActivitiesRegisterForm'
    _title: 'Register Form for activities and events'
  requirements:
    _permission: 'access content'
Just enable the module and all will work fine. Now we’re going to talking’bout the next resource: the renderer service.
The Renderer service
In the Drupal world, “rendering” means something like this: take a render array and turning it to HTML in a single piece of code, ready to sent to the client browser in a Drupal response context. In order to execute this step, we can use the main class oriented to rendering: the Renderer Class. This class is provided for internal using well from OOP context (classes, methods, objects) or from procedural context (hooks). Is offered like a “service”, available from any point and ready to executing transformations.
In the procedural context can be more easy to test, so I can call directly to the service using the form:
$renderer = \Drupal::service('renderer');
And I’ll have a renderer object ready to execute transformations. What can we do? Well, for example, from the custom module I’m using, I can write a basic hook_form_alter() for changes in my main register form. I must to know the id of the targeted form (And I know cause was created by me) but if you don’t know, you can get the id with a simple call to kint() or dpm() if you’re using the Drupal’s module Devel:

Testing the array
Ok, Now I’ll enable the debugging from my IDE, currently VSCode. In order to enable this, just copy and paste the launch.json file in a .vscode folder inside the root of my project’s folder. Get here this snippet with the file for DDEV-Local deploying from VSCode:
Then, enable Xdebug in DDEV ($ ddev xdebug on) and pulse F5 for enabling the debugging. We can set a new breakpoint in the hook_form_alter() in order to see the values returned from the render service. I’ll continue using the basic hook_form_alter() from the former step, adding a switch to capture the form_id wich I’m interested on and I’ll get the transformation from the Debug console of VSCode:
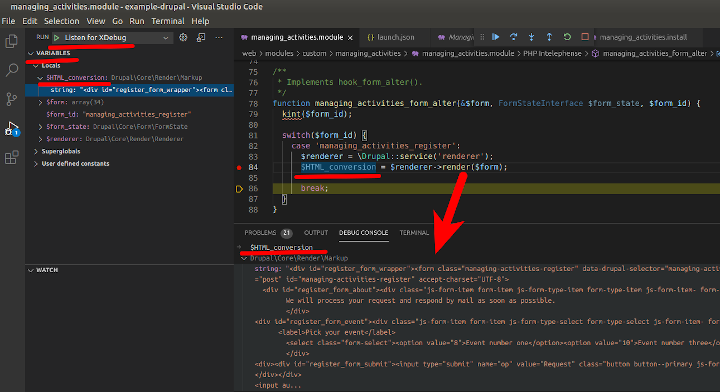
The Render Service will do the doRender() method, processing all the properties, values and children in the nested array, returning a Markup object, from the class Markup.php.
And the values are setted in this variable called by me $HTML_conversion. You can get some more info about the returned array from the Renderer service, using the string formatted to locate some items o directly ask for the length of the returned piece of code:
/**
 * Implements hook_form_alter().
 */
function managing_activities_form_alter(&$form, FormStateInterface $form_state, $form_id) {
  kint($form_id);

  switch($form_id) {
    case 'managing_activities_register':
      $renderer = \Drupal::service('renderer');
      $HTML_conversion = $renderer->render($form);
      $HTML_string = $HTML_conversion->__toString();
      $HTML_length = $HTML_conversion->count();
      break;
  }
}
It is not very usual to have to resort to decrypting the HTML generated from a render array programmatically, it is true. But for a didactical purpose, maybe quite interesting you have a way to show what’s happening from a render array to a HTML page in the internal Drupal processing.