
Tooling: Provisioning with Terraform
Written on August 31, 2020
Category: Tooling
Author: David Rodríguez, @davidjguru
 |
|---|
| Picture from Unsplash, user Gustavo Moreno, @gmmoreno |
During this summer holiday, strange and so different, I tried to keep myself entertained with a thousand technical things (in addition to the daily needs of home and family) that I had on the TO*DO list. For example, I’ve been testing the Julia programming language to familiarize myself with the syntax and its approach. Or I’ve been studying the internal architecture of arrays built in C language within PHP, and I have also used tools I wanted to know, like in this case: Terraform.
Terraform (https://www.terraform.io) is an open-source “infrastructure as code” software tool I had on my list to use since one year ago, but multiple reasons and other tools came ahead and until this summer I couldn’t get started. Essentially, Terraform allows the remote provisioning of infrastructure through the configuration of specific files adapted to each supplier (AWS, Google, Digital Ocean, Azure, etc) and each provisioning need. Ok.
In this case I would like to perform provisioning tests on Digital Ocean droplets from a local Ubuntu-based environment to prepare tests in possible remote development environments. Let’s see.
Table of Contents
1- Talkin’bout Terraform
2- Installing Terraform
3- Configuring Terraform
4- Preparing the Provider
5- Defining the Execution Goals
6- Getting a graphical review
7- Destroying resources
8- Read more
9- :wq!
1- Talkin’ bout Terraform
Today, it seems clear that Terraform is constituted as a de-facto standard. To know it on a theoretical level and to have some experience is almost obligatory, almost as much as to know Docker and to have experience containerizing projects. When I used to note the concept of “Infrastructure as code” (IAC), I actually meant the enormous ease of building files with declarative language (Terraform uses a proprietary language format called HCL) that can be versioned and replicated without any problem.
What is the key of Terraform? as they say on their website(terraform.io/intro):
“Configuration management tools install and manage software on a machine that already exists. Terraform is not a configuration management tool, and it allows existing tooling to focus on their strengths: bootstrapping and initializing resources.”
So Terraform will allow me to handle machine installations and start-up processes and will be able to coexist with tools to manage configurations in a more granular or more specific way (Chef, Puppet, Ansible). And these two categories, moreover, are not necessarily exclusive (orchestration of provisioning and configuration management), since it seems that to a certain extent, most configuration management tools can assume a certain provisioning, and in a complementary way, orchestration tools can also perform configuration management. They integrate, relate and support each other (think of Terraform + Ansible as a whole MUST).
When I think of Terraform I can see some interesting advantages:
- IaC: We can put the blueprint for a machine under a Version Control System, sharing it, versioning it and reusing it.
- Execution plans: Terraform offers something like a “planification step”, where is generating a guide about the actions to run.
- Graphical Resources Chart: Terraform creates a graphic with all the resources, giving info about dependencies, version.
- Automatization of changes: By relating the graphs of previous resources and the implementation plans, it is possible to describe and order changes with very controlled and easily reversible impacts.
It also has a very extensive list of suppliers with which it can operate, halfway between the “official” ones (terraform.io/providers/index) and those created by the community (terraform.io/providers/type/community), differentiated in various categories:
| Major Cloud | Cloud | SaaS / PaaS |
|---|---|---|
| AWS | Digital Ocean | Heroku |
| Azure | Linode | Kubernetes |
| Google Cloud Platform | OVH | Gitlab |
In this article I have set out to show the process of building a provisioning plan for an external provider Digital Ocean, creating Droplets to deploy Drupal sites (It’s not a very real approach to equip an external/remote machine with an initial blank Drupal deployment, but it will serve as a small example of use).
See:
- “Why we use Terraform and not Chef, Puppet, Ansible, SaltStack, or CloudFormation”, by Yevgeniy Brikman: gruntwork.io/why-we-use-terraform-and-not-chef-puppet-ansible-saltstack-or-cloudformation.
- Infrastructure as Code (IaC): ibm.com/infrastructure-as-code.
More about the HCL config language
- Concept: terraform.io/glossary/hcl.
- Examples: terraform.io/configuration.
- Sintax Guide and resources: github.com/hashicorp/hcl.
2- Installing Terraform
The first step is to install Terraform as a new resource in my local environment. In this article I’m using as Operating System an Ubuntu 18.04 (bionic, LTS), due to this, all my steps will have the shape of Ubuntu / Debian commands. You can find related information about others OS like Windows or macOS in the following subsection.
More about install Terraform in Windows or macOs
- About Configuring Terraform on Windows Systems: docs.oracle.com/ebs-configuring-terraform-windows-systems.
- Getting Started with Terraform on Windows: Install, Setup and Demo: adamtheautomator.com/terraform-windows/.
- Install Terraform on MAC machine: medium.com/@krishsoftware1991/install-terraform-on-mac-machine.
- How to install Terraform on macOS: medium.com/@akkireddy/how-to-install-terraform-on-macos.
Getting Terraform
Add the GPG key from HashiCorp:
$ curl -fsSL https://apt.releases.hashicorp.com/gpg | sudo apt-key add -
Now we’re adding the official Linux repository:
$ sudo apt-add-repository "deb [arch=amd64] https://apt.releases.hashicorp.com $(lsb_release -cs) main"
At last, update the info and install Terraform from the repository:
$ sudo apt-get update
$ sudo apt-get install terraform
Verifying the installation: In order to check your Terraform installation, you can use these commands:
$ terraform
$ terraform -help
$ terraform -version
And you will get some king of feedback from your prompt, something like:
drupal@drupal-workshop:~$ terraform -version
Terraform v0.13.1
3- Configuring Terraform
Now let’s look at some of the steps needed to correctly configure Terraform for the connection to the external provider (in my case Digital Ocean). For this case, I’ll need two different thing from Digital Ocean:
- API Access Token: In order to connect remotly from my local environment.
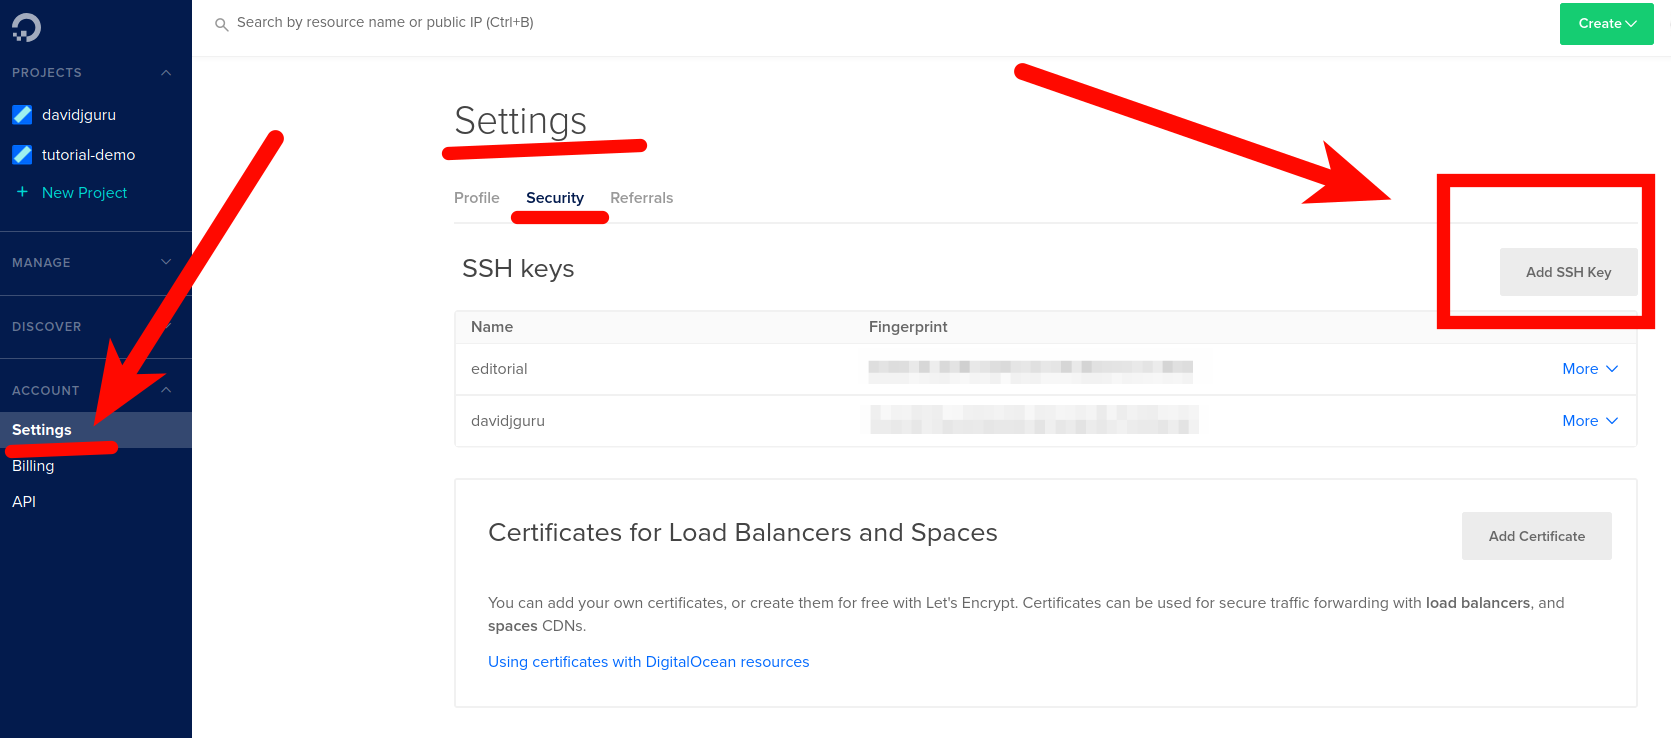
- SSH Public key: I need to load in my Digital Ocean account the public key (id_rsa.pub) from my SSH local configuration, in order to manage the connection when I’m using my private key.
If you don’t know how generate the SSH keys on Ubuntu or it’s you first time, you can read this tutorial:
- How To Set Up SSH Keys on Ubuntu: digitalocean.com/how-to-set-up-ssh-keys-on-ubuntu-20-04.
Then, load the SSH key in the right section of your Digital Ocean profile, just like this:
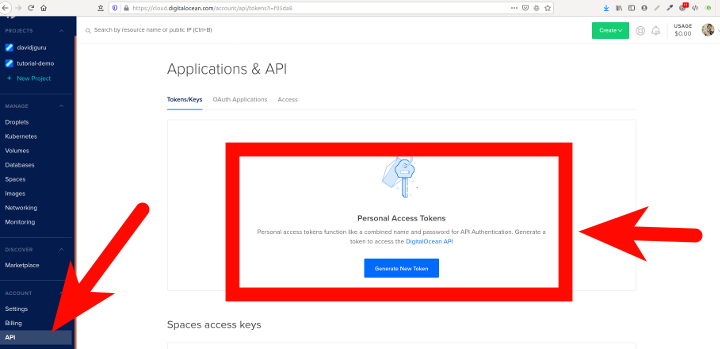
Getting an access token
Get an access token from Digital Ocean for your external connections:
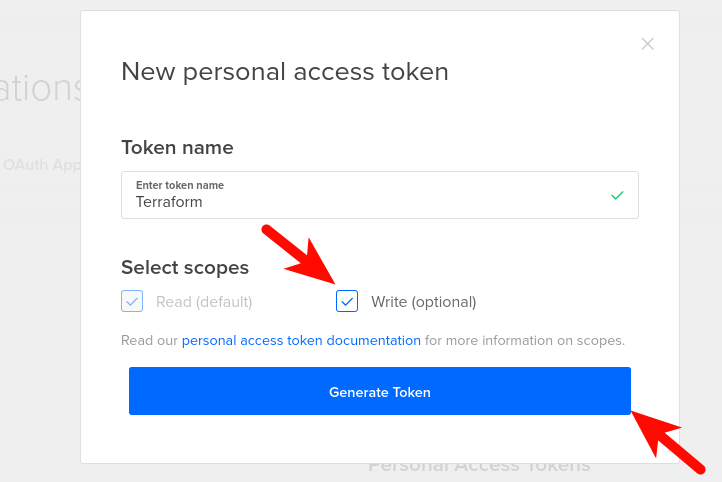
And generates the new token, giving write permissions:
Loading the token in an environment variable
You can set the token to a environment variable just for the current session with the command:
export DO_PAT="YOUR_ACCESS_TOKEN"
Or maybe you want load the value in a more persistent way in your system, so you can set the token in your bashrc config file:
$ cd ~
$ vim .bashrc
export DO_PAT="YOUR_ACCESS_TOKEN"
:wq!
Confirm the value using “echo $DO_PAT”:
drupal@drupal-workshop:~$ echo $DO_PAT
YOUR_ACCESS_TOKEN
4- Preparing the Provider
Well, Terraform uses text files to describe the infrastructure, orders, commands and set variables. The language of the Terraform configuration files is called “HashiCorp Configuration Language” or HCL (which we mentioned earlier)and is written in files created with a “.tf” extension.
For this example we will build several .tf files, so our first step will be to create a directory associated with the project that will contain all of them.
Most providers for Terraform require some sort of values for configuration to provide authentication information like tokens, user data, paths to SSH keys, URLs, etc. When explicit configuration is required, a provider block is used within the configuration, as illustrated below, something like this:
# Configuring an AWS Provider
provider "aws" {
  access_key = "${var.aws_access_key}"
  secret_key = "${var.aws_secret_key}"
  region     = "us-west-1"
}
So first, we’ll create a folder for storing the configuration files of this test project and change your position to the newly created folder:
$ mkdir ~/terraform_test
$ cd ~/terraform_test
Now, we’re going to define the provider declaration file, which will be the register for data related to the external hosting provider (Digital Ocean in this example).
First, creating a new file called provider.tf with the required plugin and its version:
terraform {
  required_providers {
    digitalocean = {
      source = "digitalocean/digitalocean"
      version = "1.22.2"
    }
  }
}
Also we’ll add some more data about required variables and values used for the future connection to the provider. We’ll need the API token and your personal private key in your local environment, I mean a string value (the token) and a file path (to the private key), two resources that we’ll charge when we’re running the execution plan. Now, we only have to declare the variables:
variable "do_token" {}
variable "pvt_key" {}

provider "digitalocean" {
  token = var.do_token
}

data "digitalocean_ssh_key" "davidjguru" {
  name = "davidjguru"
}
Ok, in the last block, I’m using the name applied to my public SSH key in my Digital Ocean profile, see:
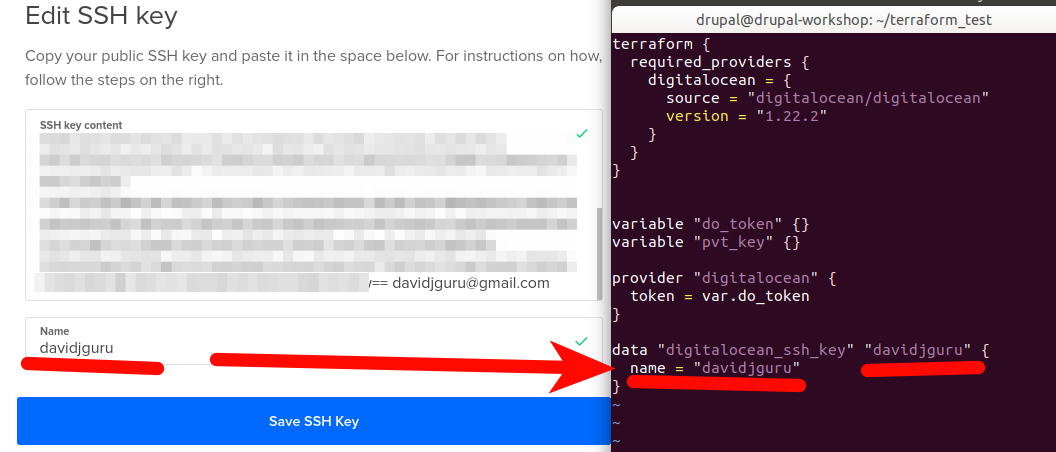
And now we have to save the new provider definition file (:wq!) and run the initialization order for Terraform, just running:
$ terraform init
Each time a new provider is added to the configuration, it’s necessary to initialize that provider before using it. This initialization process ensures the download and install of the provider related plugin, preparing it for use. And you will get all the provider resources ready-to-work in your local installation:
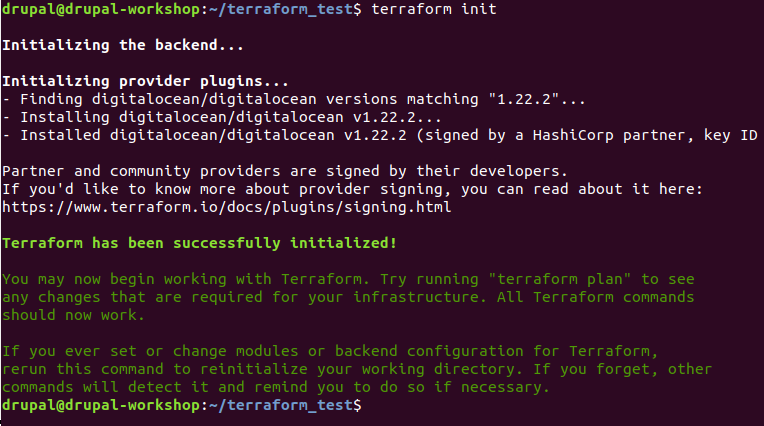
Get the file for the provider from here.
5- Defining the execution goals
Ok, we come to the most interesting part of this process…What do we really want to achieve with our machines?…What do we need to install?…It’s time to define what goals our Terraform implementation plan will have.
The scope of this test will be simply left installed in the remote environment Docker and Docker Compose, for later, in subsequent posts, connect this point from Ansible playbooks and continue the process.
So first, we’ll create a new Terraform file, called as my project: “new-drupal-droplet.tf” where I can add all the information about my needs. So using my usual editor:
vim new-drupal-droplet.tf
And we will start by defining the first block: resource. Here we can describe the characteristics of my new droplet, using some basic data as the image / OS for the system, the name of the droplet and the size. For this last data (“s-1vcpu-1gb”), we’re using the parameters defining by Digital Ocean in its own documentation.
resource "digitalocean_droplet" "new-drupal-droplet" {
    image = "ubuntu-20-04-x64"
    name = "new-drupal-droplet"
    region = "nyc1"
    size = "s-1vcpu-1gb"
    private_networking = true
    ssh_keys = [
      data.digitalocean_ssh_key.davidjguru.id
    ]
You can see the most common slugs for definitions of size in resources in this zone of the Digital Ocean API documentation, here: developers.digitalocean.com/new-size-slugs-for-droplet-plan-changes.
The next step inside the resource definition (the former block wasn’t closed) is to define the connection to the new droplet:
connection {
   host = self.ipv4_address
   user = "root"
   type = "ssh"
   private_key = file(var.pvt_key)
   timeout = "2m"
  }
As you can see, both in the first and the second description blocks we are not using specific data as keys or tokens. We’re using variables, doing transparent all the management of values and avoiding the hardcoding of personal sensible information. So our files can travel by VCS and be executed by more people without exposing personal data.
For the third block, we’re going to use the provisioner “remote-exec”, a set of instructions to execute in a remote way from the prompt of the new droplet.
In this iteration, we’ll ask some basic instructions like update the list of packages of the distro and install some resources. We’re describing something like this:
provisioner "remote-exec" {
    inline = [
      "export PATH=$PATH:/usr/bin",
      # update list of packages
      "sudo apt-get update",
      # install some basic resources
      "sudo apt install -y build-essential apt-transport-https ca-certificates software-properties-common curl"
    ]
  }
}
We can then progressively expand our needs under the remote-exec provisioner of Terraform, for example, asking for a Docker and Docker Compose installation in the machine, adding some more orders and including asking for feedback about the process by prompt:
 provisioner "remote-exec" {
    inline = [
      "export PATH=$PATH:/usr/bin",
      # update list of packages
      "sudo apt-get update",
      # install some basic resources
      "sudo apt install -y build-essential apt-transport-https ca-certificates software-properties-common curl",
      # install docker and docker-compose
      "curl -fsSL https://download.docker.com/linux/ubuntu/gpg | sudo apt-key add -",
      "sudo add-apt-repository 'deb [arch=amd64] https://download.docker.com/linux/ubuntu focal stable'",
      "sudo apt update",
      "apt-cache policy docker-ce",
      "sudo apt install -y docker-ce",
      "sudo systemctl status docker --no-pager",
      "sudo curl -L https://github.com/docker/compose/releases/download/1.27.0-rc2/docker-compose-`uname -s`-`uname -m` -o /usr/local/bin/docker-compose",
      "sudo chmod +x /usr/local/bin/docker-compose",
      "docker-compose --version",
In this second iteration, we’re asking for the docker status after install, using:
sudo systemctl status docker --no-pager
Where the option ‘–no-pager’ avoids blockage of the output from prompt, closing the feedback and returning to the console, allowing you to advance to the next commands:

See: Read more about the remote-exec Provisioner in the Terraform Official Documentation: terraform.io/provisioners/remote-exec.
Now we’re going to launch the building of the execution plan from our local console using the next instruction:
$ terraform plan -var "do_token=${DO_PAT}" -var "pvt_key=$HOME/.ssh/id_rsa"
Note: This command admits an option -out with a path to a file for saving all the execution plan, but the file will save all the personal data as the private ssh key value, so can be not too much secure. Be careful if the file is shared across a team or through a VCS.
Now after ask for the plan’s creation, we’re getting the feedback:
data.digitalocean_ssh_key.davidjguru: Refreshing state...

------------------------------------------------------------------------

An execution plan has been generated and is shown below.
Resource actions are indicated with the following symbols:
  + create

Terraform will perform the following actions:

  # digitalocean_droplet.new-drupal-droplet will be created
  + resource "digitalocean_droplet" "new-drupal-droplet" {
      + backups              = false
      + created_at           = (known after apply)
      + disk                 = (known after apply)
      + id                   = (known after apply)
      + image                = "ubuntu-20-04-x64"
      + ipv4_address         = (known after apply)
      + ipv4_address_private = (known after apply)
      + ipv6                 = false
      + ipv6_address         = (known after apply)
      + ipv6_address_private = (known after apply)
      + locked               = (known after apply)
      + memory               = (known after apply)
      + monitoring           = false
      + name                 = "new-drupal-droplet"
      + price_hourly         = (known after apply)
      + price_monthly        = (known after apply)
      + private_networking   = true
      + region               = "nyc1"
      + resize_disk          = true
      + size                 = "s-1vcpu-1gb"
      + ssh_keys             = [
          + "27328439",
        ]
      + status               = (known after apply)
      + urn                  = (known after apply)
      + vcpus                = (known after apply)
      + volume_ids           = (known after apply)
      + vpc_uuid             = (known after apply)
    }

Plan: 1 to add, 0 to change, 0 to destroy.

------------------------------------------------------------------------
So now, we’re going to execute the plan:
$ terraform apply -var "do_token=${DO_PAT}" -var "pvt_key=$HOME/.ssh/id_rsa"
This will create the new droplet:
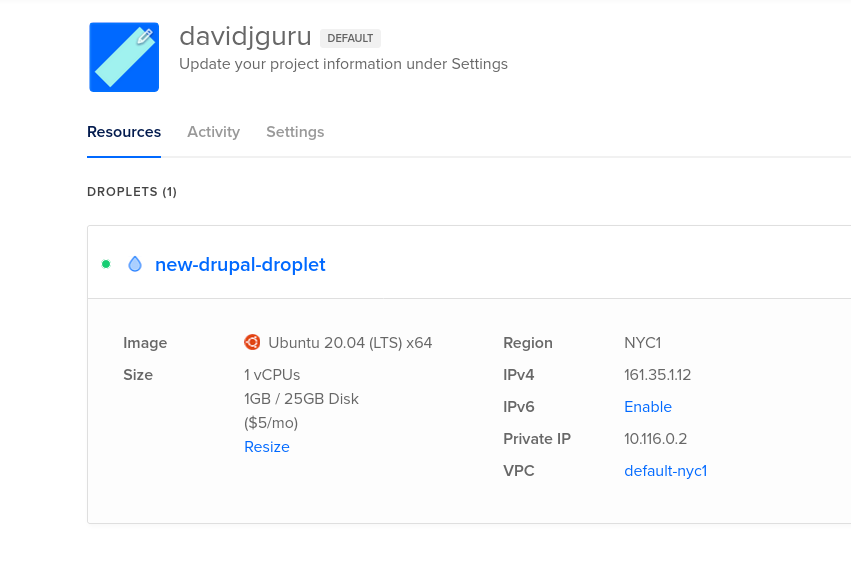
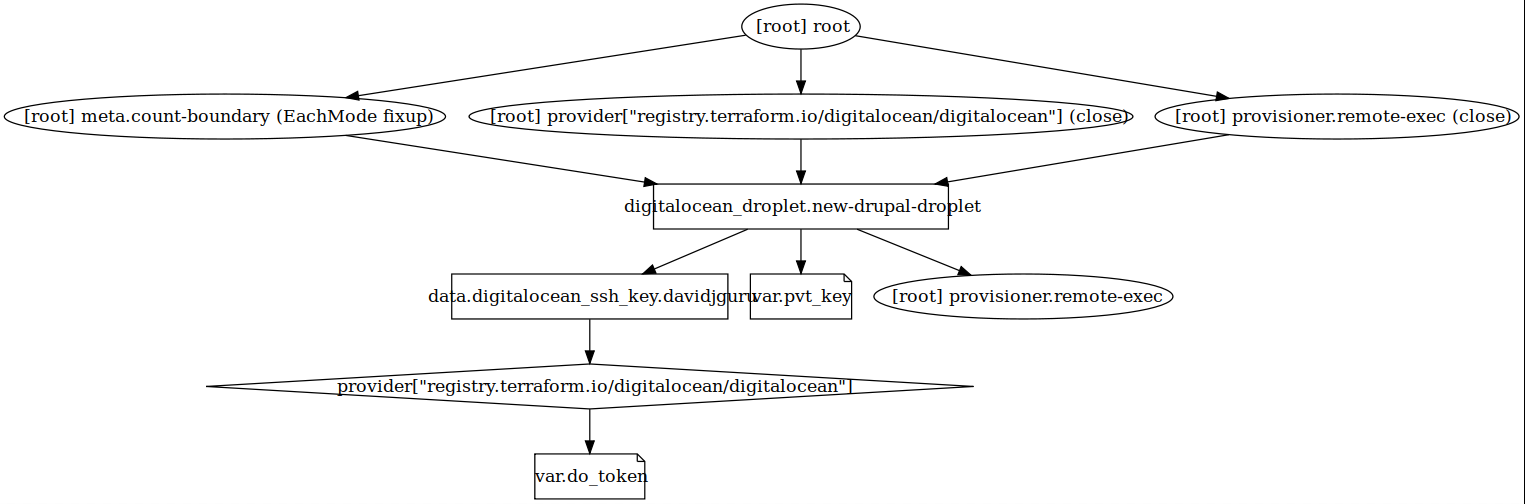
6- Getting a graphical review
Terraform has a graphical option to export a configuration in a visual way. This uses the command:
$ terraform graph
And generates an output based in the DOT format. This file can be managed using GraphViz, a Open Source Tool for graphic visualization. For my distro I can install the software doing so:
$ sudo apt install -y graphviz
$ terraform graph | dot -Tsvg > graph.svg
Ok, and this will give me a file in .svg format with the general map of my project:
7- Destroying resources
Terraform allows operations to undo what was previously executed, creating an inverse plan for destroy the resources. You can call to generating the destroy plan using the next command:
$ terraform plan -destroy -out=new-drupal-droplet-destroy.tfplan -var "do_token=${DO_PAT}" -var "pvt_key=$HOME/.ssh/id_rsa"
Getting the response:
------------------------------------------------------------------------

An execution plan has been generated and is shown below.
Resource actions are indicated with the following symbols:
  - destroy

Terraform will perform the following actions:

  # digitalocean_droplet.new-drupal-droplet will be destroyed
 [...]

This plan was saved to: new-drupal-droplet-destroy.tfplan
And a new file with .tfplan extension will be created within the project’s folder. This file contains all the plan for destroying the droplet. So then, we’ll apply the new destroy plan:
$ terraform apply new-drupal-droplet-destroy.tfplan
Apply complete! Resources: 0 added, 0 changed, 1 destroyed.
The remote droplet has been erased of the provider.
8- Read more
- A Comprehensive Guide to Terraform (Series), by Yevgeniy Brikman.
- Terraform Offical Documentation about creation of Digital Ocean’s Droplets.
- Linode, a beginner’s guide to Terraform.
- Terraform Functions, Expressions, Loops -Examples-, by Stanislaw Szymanski in Spacelift’s blog